


Finally, about a week and a half ago, I finished the paver path around the four raised veggie beds. It actually looks better than I thought it would, to be arrogant and honest. I did all the work myself.
Just for recap, since this is a bit of a DIY blog...I basically followed the directions I found everywhere for laying patio pavers. The beauty, though, is that I didn't have to dig one inch here. See, this is the area that floods about 5-6 inches deep. So, there you go.
I bought basic paver stones from Menards, as well as the paver base and leveling sand. It took 300-plus paver stones to do this spot (keep in mind, there are three paths that branch to the left between the beds too).
I threw down bags and bags of paver base first. Built it up about three inches or so. Because of the space here, though, the hard part was the tamping down of the paver base. I had to buy a tamper tool and do it by hand (really, by arms and back). One thing I realized though, too, was that rain actually does a really good job of settling paver base for you as well. Since this took several weeks to complete, I found that out during the process. The rain settled the paver base quite well.
I then got the leveling sand and put down about 1-1.5 inches of it, filling in with pavers as I went...leveling each individual one as best as I could, all the while keeping with my (non-level, for drainage away from the garage and out toward the alley) line.
The tricky part was up against the fence on the right, for two reasons.
1. The fence panels now go below the level of the paver path, but I had to find a way to prevent the sand and paver base material from running through the fence pickets into my neighbor's yard -- both permanently AND temporarily. I didn't have the room to install those plastic paver stakes (I wasn't taking the fence down and then putting it back up), and I didn't want to "waste" space either. I ended up buying plastic garden edging -- the rigid plastic, not the rubbery, flexible stuff. I pounded it down into the ground a bit and then kept it wedged tightly between the paver base, leveling sand, pavers and fence pickets. You don't even notice it, really, and it should hold up over time. The fence is likely to wear down before it does.
2. Some idiots (looks in mirror) didn't put the fence up exactly straight, as evidence but the second full row of pavers on the right. That last "freestanding" post is a hair too far to the left of the straight line of the fence. And, as we all know, a hair stretched out over 16 feet of pavers creates a real pain in the ass. So I had to cut about a dozen pavers LENGTHWISE to fill in that gap. Thankfully, I got a wet saw for cutting the end pavers (since I used a running bond pattern) and was actually able to knock out all of the cuts in about two to 2 and a half hours.
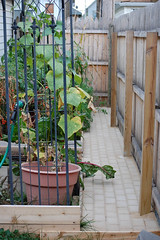
For the fill, I wanted something that would not just be sand and flow out of the areas in between over time. So I bought polymeric sand...got the Quik-Crete paver bond stuff. Had heard mixed reviews about it, but I had confidence that I could do it right, and hopefully it would harden up nicely and last. So I swept in about a bag and a half (50 lb. bag) slowly and thoroughly, and followed the directions to mist it lightly a couple times. I built up (as you can see) a couple mounds of it around the fence posts too, for added stability and to try and help prevent washout (or wash-in) of any materials. A few days later, I went out there and checked, and the mounds were solid as a rock. So, score!
For now, as you can see, I have a board at the close end -- I'm going to have to cut that board down, both ways, so that nobody trips over it and it looks a little more "purposeful" there.
But overall, it's really allowed the beds to look nice, and I'm hoping it really helps diminish the flooding problem back there (given that it's now "high ground"). At the very least, I won't have to stand in mud and weeds galore while working in the garden, and that in and of itself is fantastic!
Friday, September 10, 2010
Subscribe to:
Posts (Atom)