Showing posts with label Upstairs Bathroom. Show all posts

Monday, August 6, 2012

The trouble with time ...

Despite my silence over the past eight months (awakened by my cousin, who "complained" that I never update the blog), things have been progressing, albeit on a variety of different projects here at Building a Better Bungalow.

When we last left you, I was in the process of sanding down the vanity in the 2nd floor bathroom. After much sweat and sanding, I got the whole thing stripped down, and then I got to staining it. I'd never truly stained anything before in my life -- just painted -- and aside from an occasional over-absorption in some areas (which I then quickly buffed out and restained to match as best as I could), I was pleased with the final result.

I then switched out the drawer knobs for pulls, so I had to fill and stain the knob holes and re-drill holes for the pulls. This was a bit more challenging, but I made it through just fine. After all that was finished up, we installed the new sink/counter and new faucets, and now we have two working sinks upstairs (which we did not have prior to the renovation)! It's great to have water pressure in both sinks...apparently the waterfall faucets that the previous owner had installed must have been corroded to hell and back inside, because they were non-functional, for the most part. I was happy that new faucets solved the problem that started us down this road to begin with.

After the sinks became functional again, it was spring-time, and that put this project on hold -- waiting for us to select new light fixtures, new mirrors and get an electrician out to move the light fixtures to where we want them. No more recessed lights, and a center-room light, will be nice! But that will come later this fall, hopefully.

Since spring, obviously, it's been gardening time -- my vegetables have been doing well despite the drought conditions, but I keep them very well-watered. I barely water my perennial garden, and fortunately, they're mostly natives and drought-tolerant, so they're actually doing well, although the ultra-warm spring we had really threw off their bloom schedules quite a bit.

I had hoped to get the backyard in better shape -- get new concrete laid in the back and for the sidewalks, dig up the patio pavers that were the base for the old hot tub and move them to a more functional spot, and plant grass where the hot tub formerly was.

However, our deck, which had been poorly constructed and maintained by the previous owner (and then not maintained very well by us, either, unfortunately), decided to crap out. Several of the stair treads warped tremendously and popped their screws, making for a quite dangerous situation. I had hoped to put off renovating the deck for another year or two in order to totally demolish, rebuild and expand it, but there was no way to put it off.

I decided to pull all the surface decking off (treads, risers and decking) and replace it, because it was heavily weathered and installed incorrectly in many instances (cupped upward instead of downward). Furthermore, the screws that the PO used clearly were not the right screws, as they'd corroded and rusted, which is what started much of the problems.

I considered composite decking, but at the end of the day went with cedar. My parents just had a full composite front porch put in, and I don't really care for the look all that much. Plus, I'm confident that I can take better care of cedar than composite, so I went with the cedar.

I also decided I'd replace the balusters and handrails, so basically I was stripping the deck down to the structural pieces, which were in pretty solid shape overall. I began with the handrails and balusters, and replacing those was surprisingly simple.

That having worked smoothly, I confidently moved on to the stairs, and that's where I stand now. You see, one of the reasons the stairs warped and popped loose was that the idiots who installed them used thicker boards for the treads, but only two stair stringers across about 38 inches. None in the middle at all. In reality, we're lucky we never busted through the center of the stairs.

That meant I needed to add stair stringers, and that's when the fun began. Since I had to add two stringers, I decided I would just get rid of the original stringers as well in order to fix the stair run -- another mistake by the original installer, which gave us a bottom step that was approximately 10 inches off the sidewalk (while the other steps were "standard"). For several years, we've had a limestone step up against our stairs in order to "add" a step. No longer will that be necessary.

Now, little did I know that building stair stringers would be an ultra complicated process. But finally, yesterday, I got the third and fourth stringers secured to the deck. There were several issues that came up along the way, most of them involving the poor design of the original deck, which would not accept any standard style stringer attachment.

So, my reinforced stringers are cut and installed, and they are close to level, though I'll need to shim them here and there in order to get the treads screwed down right.

Then, it's on to replacing the decking itself, and trying to figure out why the PO spaced the joists in some erratic pattern (20 inches apart here, 12 there, no rhyme or reason to it). I'll probably end up having to pull down the joists and either move or replace them as well.

Once again, fixing other people's mistakes. I don't have any pictures currently, but will try to be better about taking some or at least uploading the ones I have on my phone to Flickr in order to share them here.

For now, here's hoping I don't go too long without posting again. Or else my cousin will complain. :)

Saturday, January 21, 2012

When a DIY plan works ...

Man, it's great to see the fruits of hard work actually come to fruition.

On the right is one of the faces of our bathroom vanity, sanded down by me (about half with my palm sander and half sanded by hand). On the left is the other face (or, what they both looked like before I sanded the one down).

I'm thrilled that this worked, I really thought it was going to be much, much harder to sand in all the crevices and such. It sure wasn't "simple" but taking my time and tinkering around got the job done.

I've also sanded down about half the face of the actual cabinet, and that's coming off nicely as well. I'm happy that this is going well thus far. Again, it's a lot of manual labor, but that's OK. That's the whole point of DIY -- it makes the finished product that much more satisfying!

Friday, January 20, 2012

The benefits of half-assed previous work...

Well, for once, I benefit from the previous owners' half-assed work.


This photo is the old sidesplash for the vanity/sink top that we're getting rid of in the upstairs bathroom. Note how well this sidesplash was attached to the wall. That bead of silicone seal or whatever it is? Yeah, that's the only thing that was holding it to the wall. It was just resting on the top.

Furthermore, I was pleased to find out that these geniuses didn't bother attaching the entire top to the vanity in any way. It was attached to the plumbing, which was the only thing holding it in place. Nice.

That means that removing this will be much easier, which further means that we can keep the vanity and refinish it, rather than spending hundreds of dollars on a new one. Also, because I'll be able to lift this top out undamaged, I can donate it and get a tax writeoff, potentially, as it won't be a broken or damaged item. Score!

So, today I disconnected the plumbing for both sinks and prepared to remove the sink/counter top when I can get some help. I also played around with the sander, seeing how easily the finish would come off the vanity, and it looks as though this will be pretty much a no-brainer of a project.

More this weekend, I'm sure...lots to do. Also, will try to post some pics as I go along.

Sunday, January 15, 2012

It begins ...

As mentioned in my previous post, we've finally replaced the bathroom skylight with roof. Finally, there will be no more leaks.

Anyway, to save money on the final bill from the carpenter, I decided I would finish the interior of the project myself (insulate and drywall), mostly because we've decide to us this as an excuse to partially remodel the bathroom.

What's staying: The floor, the toilet, the shower and the shower surround. Also staying: the linen cabinet behind the door.

What's going: The sink faucets, the counter top.

What's changing:
-- Because we're afraid that a 60-inch vanity won't make it up the stairs of our fine Chicago bungalow (we've had trouble with getting the furniture we wanted for upstairs because of the narrow, steep staircase), and there's really nothing wrong with the vanity at the end of the day, we've decided to sand it down and stain it to our liking, along with the matching linen cabinet. We were going to get two separate, smaller vanities, but I checked and found that the floor tile was not run all the way under the current vanity. So if we had gone that route, we'd have had to redo the floor entirely.
--Currently, there are four recessed can lights in the bathroom. They provide plenty of light, but not the kind conducive to shaving or showering or things like that. I hate them and want them out. I'd like to have a more traditional, center-of-the-room light that illuminates the entire room, and then sconce-type lights by the new mirror/medicine cabinets.
--We're definitely getting a new vanity top and new faucets, so we're psyched about that. We might even be able to use both sinks!

What we're "afraid" of:
--Well, I'm nervous about the water pressure. When we changed out the shower head and toilet up in this bathroom, it solved the water pressure issues in those two areas. I'm hoping the same thing will happen here. If not, we will have to have a plumber come out and figure out how to fix the situation.
--We're not sure how the refinishing of the cabinets will go. Hopefully, it will be no problem at all, and that will save us some real money when all is said and done.
--Hopefully we can get the vanity top off the current vanity without any damage. Otherwise, it's square one for the vanity.

So, here's hoping I can keep up and give you all some great updates, with construction now getting back on track here at the bungalow!

Saturday, January 7, 2012

Where the time goes ...

Wow, it has been since September since I posted.

Yikes...well, I guess, though, that makes some sense...you see, we've been dragged away from normality by a few things, so it happens. Here are some updates...

First, at the end of September, we got into a serious wreck on the interstate in N.W. Indiana, heading off to the apple orchard. Fortunately, none of us were hurt, but our Altima sure got hurt pretty badly. After wrestling with the other driver's insurance and her own inability to get a statement in, we were found completely fault-free (which we'd figured), and all was paid for. But this took until the week of freakin' Thanksgiving to get sorted out. With that potential budget drain over our heads, we had to hold back on our spending, just in case.

Next, we bid adieu to my roommate and friend of the last 11 years, my dog, Kazak. His hips had started to really go bad on him, and his appetite was also slipping. On Dec. 7 (the day that will live in infamy, which is the only reason I'll remember that was the day that this happened too), he fell down the back stairs and couldn't get up. His liver, it turns out, had also begun to give out on him. The vet believed he had liver cancer as well, and that it was just a matter of time. That day, at the vet, after carrying him to the car and into the vet, I decided to have him put down. R.I.P., my friend. I know you will.

Then, of course, the holidays always get in the way of things. But, we've moved on since the holidays -- not only have we rescued a young pup from Chicago Canine Rescue Foundation (Pillsbury, or Pils, as I call him), but we also had a carpenter come out and finally take care of that stupid, leaky skylight in the bathroom ceiling. It was a dumb idea by some previous owner -- actually, a great idea, just piss-poor execution...or maybe not. So, here are a bunch of before pictures, to give you an idea of what it was... 


And here is an "after" shot of the roof patched up.
What does this mean? Well, more or less, "We're back in business, baby!"
Stay tuned for my next post...which follows up on these developments, of course!

Friday, November 7, 2008

It's gettin' hot in here...I hope...

So, after assessing the insulation quote we got, and then (as previously mentioned) finding out that the HCBA had run out of funding for its Energy$avers grant this year, we decided that insulating the first floor brick walls can wait. First of all, it would cost us as much as it would to insulate the portions of the second floor that need insulation, in effect, doubling our ultimate bill. Secondly, I'm not entirely sold on the effectiveness of insulating the gap between the lathe/plaster and three wythes of brick. I mean, these bungalows were built originally to be energy efficient, in a sense...the brick is thick enough to keep the air out, and I'm not sold on the fact that foam is going to make a major difference, honestly. Maybe I'm wrong...if I am, and there's some evidence out there that supports it, please, let me know. I'm just operating on common sense here! :)

So, we're gonna get the floor in between the first and second floors filled with ProPink blown-in insulation, the knee wall on the slanted side of the roof insulated and house-wrapped (though I need to ask them about what that might do to the storage in the crawlspace--make it cold? make it "damp"? That would be bad. Also, there are two areas that we currently do not have access to in the corners of the dormered side. They'll cut an access hole in the wall to each and insulate behind there and under the floors there too. The only "disappointment" is that they can't get access to the flat dormered roof...I was hoping to have that insulated as well...particularly in the hopes that it would help to soundproof it, since we hear the rain falling on the roof a lot of times, and that's kinda distracting, particularly at night when you're trying to sleep. But they couldn't do it, apparently...oh well.

All in all, I'm hoping that this, coupled with weatherstripping the stupid casement windows up there (I HATE casements, especially since they have no storms and the screens are on the inside of the windows), will help us out on our gas bill, and possibly on our electric bill in the summer.

The insulation company did tell us that a lot of the upstairs is insulated and that the kitchen addition is insulated also. So that's good.

In terms of the Energy$avers grant, we're hoping that next year, we'll be able to use it to replace our water heater, furnace or see about installing some sort of energy-efficient central air system. The grant is awesome, and I'd like to get as much money out of it as I'm eligible for -- which is probably what everyone did this year, and that's why they ran out. It's not greedy...it's smart! :)

Anyway, the insulators are scheduled to come the week after Thanksgiving, so we might even get to feel some positive effects of all the insulation this winter. And that's good! So we'll see how it goes...I will certainly keep you all posted!

Saturday, April 19, 2008

BIG day at the ol' bungalow...

Wow. I look back on today and I'm pretty impressed with how we've turned some bad things around today. We didn't do "a lot" of work, but a host of things have improved.

1. The plumber came today and installed the new supply line from the city shut-off to the tee to the rest of the house. Has it made a difference? Hard to tell...but, I'll tell you, that 85-year-old galvanized pipe was nice and crusted up inside. So, if anything, at least we're not drinking THAT water anymore! Sorry that I forgot to take a pic of that, and of course, the alley scavengers took that pipe in about an hour's time. There's one piece left to swap out, and that's the valve. We need to get the city out to locate the outside shutoff so the plumber can swap out the old valve. Then, we're good to go.

2. Bungalow Avenue (see previous post) delivered my two new stone planters for the front of the house. I'm FLOORED at how PERFECT they are and how beautiful they look. I'm so glad that, for once, I saw something early enough that I was able to take advantage and do something nice. I will take pics tomorrow, I promise...wait till you see them. They couldn't be more perfect.

3. I put my Chevy Equinox to the test today as well...after crunching the numbers every which way possible and then taking a good hard look at the current fence, I decided to go with the idea suggested by my dad as well as Jennifer from Tiny Old House, which was to keep the rails and pickets and just buy new posts. So I did that. I bought 20 4x4 8-foot posts and 10 bags of instant post installation mix. I figured I'd try that stuff, although my dad is bound to scold me for not doing it the old-fashioned way. Hey, I've mixed up enough concrete in my life to earn a pass this time. Anyway, we loaded all this ridiculously heavy stuff into the Equinox and set off, gingerly, from Morton Grove on back down to Portage Park. Thankfully, there weren't a lot of big bumps on the way, so we survived. But it was a harrowing feeling, worrying about somehow damaging the car...oh, and having blind spots all over the place. The boards barely fit from the dash all the way to the back door, stacked from floor to ceiling. Not the safest, but what could I do?

So we're about ready to do the fence, whenever we actually get the time to do it. For now, the stuff will all have to sit in the garage, waiting for the right weekend. :)

4. I figured out that the upstairs shower problem was the shower head. Since I didn't like it anyway, and it was, in effect, broken, we bought a new shower head. Waterpik makes an "el cheapo" rain head (which just means it's chrome-plated plastic rather than metal) that was, like, $20 or so at Menard's. I figured what the heck, why not try it? Now, the key thing here is, I know I've learned some things because, for once, a project that the box claims "Installs in minutes!" actually took only minutes to install. So that was a nice feeling. And the shower works well, so far. Of course, I pulled the restrictor out, because I'm just not an environmentalist (just kidding...don't they say, "Know your audience?" ;) ). Nah, I pulled it because I wasn't sure if the water pressure would still be too low up there. Turns out, it's pretty good. So I'll leave it and see how it goes for a while.

Tomorrow, I think I'm going to plant and plant and plant. And probably cut down the Hicks Yews I have in front. Anybody in the Chicago area who might want them, you're welcome to come and save them. There are two chest-high ones (I might transplant one, rather than chop it to bits) and one vertical, about 8- to 10-foot tall one that are definitely getting either moved or chopped down. Let me know ASAP, of course, and we can try to work something out. I don't expect anyone will want them, but I thought I'd ask.

So we shall see. For sure, I'll have pics though!

Oh yeah, and last but not least at all, head on over to One Project Closer to read about all of Fred's great stuff and to see my Houseblogger Interview from Friday's edition. It's good reading, if I say so myself. :)

Friday, November 23, 2007

Nice when you know what you're doing...

...of course, that doesn't mean I didn't have to make TWO trips to Home Depot. But that's better than four. :) Reference this post from my personal blog, from when I remodeled the half-bath of our condo myself...thankfully, I did, as it says, 90 percent of the work, so I had "practice."

Thus, when I decided that I'd had enough of these pressure-assisted toilets--specifically the one upstairs--I was only partly worried that all hell would break loose. That was based on only the "curse" of projects and how they go haywire in this family. :) I knew that I knew how to replace a toilet, and that I could do it pretty easily.

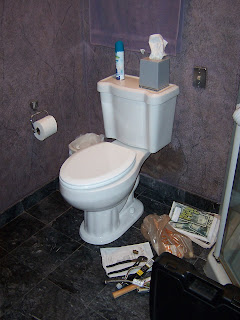
As such, ladies and gentlemen, our new toilet upstairs:
It's a Pegasus Westminster(?), I believe, from Home Depot. It's not a pressure-assist toilet, which means that, although it takes a little while to fill the tank because of the low water pressure to the second floor, it will actually still fill, whereas the pressure-assist tank would not. Think of how you blow up a balloon--you're the water supply line and the balloon is the pressure-assist tank. You have to exert more pressure to get air into the balloon than the balloon is exerting to get air out of it. This is what was happening with my toilet up there--too much pressure in the tank was overpowering the weak supply flow.

Now, I still have to fix the low water pressure in the house, but at least this will buy us more time to figure this whole thing out--maybe even a LOT more time. We'll see. At any rate, it took me longer to go to Home Depot, pick and buy the toilet and come home than it did to actually take the old toilet out and put the new one in. So I'm feeling good about that. :)

Finally, of course, Happy belated Thanksgiving...we hosted both families yesterday, as we're now the ones with the most room. And it was great. Hope yours was a good one as well!