Sunday, November 7, 2010

chain link posts done...

Well, there's been a lag in updates because Gina and I welcomed our second son into the world nearly two weeks ago. But, here's a picture of the last thing I did before the baby was born. :)

I had dug this post hole, and I knew we were going to the hospital the next day, so I wanted to stick the post and lay the concrete. Done and done.

Now, over the past two weeks since, my buddy Luis came over to help me dig the other post holes and stick a couple other posts. Today, I finished the posts up. It's "easy" hard work...and, I discovered, it's best done during the day. One post that I hurriedly stuck during the week after work as night rolled in is, of course, slightly off...not happy about that, but ah well...We'll see what happens, I guess...

Anyway, the chain link fence is almost done...I'll post some pics once I get it going. Now, to go take advantage of the end of Daylight Savings Time and get that extra hour of sleep...aw yeah! :)

Friday, September 10, 2010

Just another brick in the ...

Finally, about a week and a half ago, I finished the paver path around the four raised veggie beds. It actually looks better than I thought it would, to be arrogant and honest. I did all the work myself.

Just for recap, since this is a bit of a DIY blog...I basically followed the directions I found everywhere for laying patio pavers. The beauty, though, is that I didn't have to dig one inch here. See, this is the area that floods about 5-6 inches deep. So, there you go.

I bought basic paver stones from Menards, as well as the paver base and leveling sand. It took 300-plus paver stones to do this spot (keep in mind, there are three paths that branch to the left between the beds too).

I threw down bags and bags of paver base first. Built it up about three inches or so. Because of the space here, though, the hard part was the tamping down of the paver base. I had to buy a tamper tool and do it by hand (really, by arms and back). One thing I realized though, too, was that rain actually does a really good job of settling paver base for you as well. Since this took several weeks to complete, I found that out during the process. The rain settled the paver base quite well.

I then got the leveling sand and put down about 1-1.5 inches of it, filling in with pavers as I went...leveling each individual one as best as I could, all the while keeping with my (non-level, for drainage away from the garage and out toward the alley) line.

The tricky part was up against the fence on the right, for two reasons.

1. The fence panels now go below the level of the paver path, but I had to find a way to prevent the sand and paver base material from running through the fence pickets into my neighbor's yard -- both permanently AND temporarily. I didn't have the room to install those plastic paver stakes (I wasn't taking the fence down and then putting it back up), and I didn't want to "waste" space either. I ended up buying plastic garden edging -- the rigid plastic, not the rubbery, flexible stuff. I pounded it down into the ground a bit and then kept it wedged tightly between the paver base, leveling sand, pavers and fence pickets. You don't even notice it, really, and it should hold up over time. The fence is likely to wear down before it does.

2. Some idiots (looks in mirror) didn't put the fence up exactly straight, as evidence but the second full row of pavers on the right. That last "freestanding" post is a hair too far to the left of the straight line of the fence. And, as we all know, a hair stretched out over 16 feet of pavers creates a real pain in the ass. So I had to cut about a dozen pavers LENGTHWISE to fill in that gap. Thankfully, I got a wet saw for cutting the end pavers (since I used a running bond pattern) and was actually able to knock out all of the cuts in about two to 2 and a half hours.

For the fill, I wanted something that would not just be sand and flow out of the areas in between over time. So I bought polymeric sand...got the Quik-Crete paver bond stuff. Had heard mixed reviews about it, but I had confidence that I could do it right, and hopefully it would harden up nicely and last. So I swept in about a bag and a half (50 lb. bag) slowly and thoroughly, and followed the directions to mist it lightly a couple times. I built up (as you can see) a couple mounds of it around the fence posts too, for added stability and to try and help prevent washout (or wash-in) of any materials. A few days later, I went out there and checked, and the mounds were solid as a rock. So, score!

For now, as you can see, I have a board at the close end -- I'm going to have to cut that board down, both ways, so that nobody trips over it and it looks a little more "purposeful" there.

But overall, it's really allowed the beds to look nice, and I'm hoping it really helps diminish the flooding problem back there (given that it's now "high ground"). At the very least, I won't have to stand in mud and weeds galore while working in the garden, and that in and of itself is fantastic!

Friday, August 6, 2010

Sunflower harvested...


aj and sunflower 2
Originally uploaded by southsideandy
So, here's a picture of the 11-inch sunflower I harvested earlier this week. I know I promised pics of the gardens, but of course, the minute I promised them, the storms rolled through and mowed a lot of things over on me. So the nice, straight-standing flowers and veggies were pushed around pretty badly.

Anyway, this sunflower head produced enough seeds to fully cover a standard cookie sheet for roasting. Quite a lot of seeds...and this is the first sunflower I've EVER grown in my life. So I was psyched!

Plus, I've been working whenever I can on the paver walkway around the raised veggie beds in the back. I'm making so-so progress, though I'm not in any particular hurry, to be honest. It should look good and should solve the problem of drainage back there once and for all.

That is good, because I'm having a tough time with my cherry tomatoes this year splitting while on the vine. I've read in a couple places that means that they're getting too much water (and thus the insides are growing faster than the skin can keep up)...well, since the storms have left standing water in between the raised beds back there for a day or more at a time, yeah, I'd say they get too much water. So, hopefully the paver walkway (with its crushed base foundation and such) will help keep the standing water away from there.

Saturday, July 24, 2010

Sigh of relief...

Well, I saw the thunderstorms coming yesterday evening and went to bed around 10:30 because I had a feeling I'd be getting up. The storms woke me up around midnight, and some of the bomb-like lightning strikes spooked the dog. So I had to go down to the living room to ease his fears and try to catch a glimpse of radar.

I have DirecTV, and I have no complaints...I expect that it will go out during a severe storm, and it does. OK. But, from about 1 a.m. to 4 a.m. yesterday, I think the Weather Channel showed a closeup of the Chicagoland radar maybe once. All they did was talk about stupid tropical depression Bonnie.

I digress. I happened to notice the insane amount of water in my backyard. I began to get nervous about the basement flooding again. Fortunately, the sandbags are a near-permanent part of the landscape around the stairs by now. But I was worried about the sewers backing up into the house. The street in front looked fine -- no flooding. But we just dropped a pretty penny to have our sewer line power-rodded and scoped, and the city had replaced several lengths of damaged sewer line in the street that may have contributed to our last sewer backup.

So I waited "in between" storms to go out, check the catch basin (no backup!) and drop my pump down it, just in case.

Thankfully, for once, we got only a minor bit of seepage in the laundry room, which I knew about from last year's not-so-epic-anymore flood. That flowed into the drain and out of the house. Same with the little bit of water that seeped under the sandbags.

So, even though we had more water in our backyard than I've ever seen (O'Hare airport, which is due west of us, recorded 6-7" of rain in 24 hours), the basement survived this round. It's nice when investments pay off, particularly in the realm of mental sanity.

Several bloggers I follow weren't so lucky, and my condolences go out to you...and, even though I didn't suffer any damage, I will be heading down to my buddy's house in Elmwood Park to help him tear tons of stuff out of the basement. He had about a foot or more of water throughout. So my thoughts are with all of you...

Thursday, July 22, 2010

Vegetable raised beds retrofitted and extended...

In order to lay patio pavers around my raised veggie beds in the back (and once and for all end the flooding back there!), I had to make some modifications to make life easier -- in other words, limit cutting of pavers as much as possible. I'm not looking for "perfect" or "beautiful" here, I'm just trying to get the pavers down right, but easy.

Anyway, to refresh your memory, here is a photo of the four raised veggie beds as they originally appeared (this is actually a picture of three of them...the fourth wasn't finished yet in this photo, in the back).
3 garden beds

So, I had to pull out all the blocks and bricks and replace them with more permanent cedar boards. I also took the closest bed to you in the picture and doubled its size to 8 feet long (toward the camera). So now it sticks out past the garage (see the corner of the garage in the lower left). My plan is to "build" a sandbox for my son (and second kid too, obviously), to the left of the long raised bed, in the new corner created by the bed and the garage. That would give them some shade when they're playing. But that's a project for another time.

So, today I finally finished replacing all the blocks with wood, and that means I can move on to starting the paver process. I will try to take pictures next time I'm out there, because I should mention that I did all this replacement and adjustments without digging out any of the veggies I had planted. :)

Thursday, July 1, 2010

It took roughly 3 summers...

...but the east fence is down (with an assist from Mother Nature) and the entire length of it is garden-ized...no more lawn. You can see way in the back of this picture the hedge-row I planted.
I had to raise the ground up next to the sidewalk, so I had to build a half raised bed type of thing to level off the ground. It's part of why the back floods. The sidewalk is a good six to nine inches below the alley and the neighbor's yard.
Since the neighbor (as evidenced in this photo) doesn't have a garage, I wanted to create a little bit of privacy without the privacy fence. Plus, my neighbor's garden is beautiful and quite large, and blends really nicely with my thin garden here. You almost miss entirely the chain-link fence in between.
So, in the back, there are five shrubs -- two varieties. I needed something that wouldn't get much wider than about 5 feet (and that would need to be pruned, likely), but would grow 6 feet or higher.
I went to Lurvey's nursery in Des Plaines after researching my brains out in books and online. I had two plants in mind...and thought -- with the help of the helpful consultant there, that getting both would lend some variety to the row.
I did not want a plain-old boring privet-type hedge, and definitely didn't want evergreens. I wanted to have multi-season interest, and was hoping to be of assistance to the birds, even.
So I bought three Red Chokeberry bushes and flanked them with two Blue Muffin Viburnum bushes.
In the fall, I should have a burgundy and red leaf show. In the winter, red and blue berries, and in the spring, plenty of white flowers.
As for the rest of the garden here, this year (knock on wood) has been the best year so far for my perennials (which is, actually everything you see here). This photo is a little older, so I'll try to take an updated one sooner than later. But things are just blooming, growing and staying "under control" pretty darned well.
I'm really pleased, and wishing I had more space now! :)

Saturday, March 27, 2010

aj digs in the dirt

I have a future helper in the garden, it appears.

Monday, March 8, 2010

Curses, foiled again...

The point of this blog, other than to share with all of you my successes and failures, is/was in order to also provide a fail-safe way of cataloging for myself everything I'd done, to learn from failures and reap the benefits of success over and over again.

Of course, fail-safe proves to be a failure in this case!

I've been hunting all over the house for the seed packets for the veggies I bought and grew last year, specifically the broccoli and carrots. They were so tasty and very successful, I wanted to buy that variety again. Haven't found them yet (I swear they're here somewhere), but I thought maybe I'd mentioned the varieties here -- of course not. DANG!

Ah well...as you can tell, I've got the itch to get the garden plans going -- especially since I got a huge 30-pound load of processed poultry manure fertilizer pellets that supposedly will make my veggies ROCK this year (even more so than last year)! Since I got this for free (a random job perk, believe it or not), they have no reason to sell me on the effectiveness. We'll see how it goes, of course... :)

Anyway, I gotta figure out the varieties of carrots and broccoli...where did I put those packets!? :)

Sunday, February 7, 2010

The pain of DIY work...

I was going to not take the pic and/or share it until I was completely done because I didn't want to give away the big reveal yet, but I had to. I worked too hard and killed myself too much to not. Anyway, here's the basement family room at this stage. You can now see the paint scheme/colors (more or less), and here's the floor, with the main portion of the room finished. This space is about 30 by 12 feet. I did all of this MYSELF -- a little more than half the room on Saturday alone...(from just right of the outlets on the far wall to the left edge of the floor. I was a machine.

Laminate flooring is "easy" but it isn't as easy as they say...it takes a lot out of you. I'm not a marathon runner or weightlifter, but I'm not terribly out of shape. There's a lot of pushing, pulling and the like, and it KILLS your knees and back (even with kneeling on a foam pad). I was dead-tired today and still sore a bit...thankfully, I was able to sit down and watch the Super Bowl and do mostly nothing else.

There's another picture on my Flickr site of the "layers" of subfloor too, if you're interested. It's Tarkett Heartland laminate (I believe it's discontinued...bought it at Menard's more than a year ago, because it was something like 79 cents a square foot and came with a 25-year warranty!) on top of a vapor barrier-enhanced pad (DuoFoam with Self Seal), which is on top of Platon (www.systemplaton.com, if you don't know what it is). The Platon is placed on top of landscape fabric, per recommendations on the package (for sound dampening against the concrete floor, I believe).

I still have to finish the "wing" off to the left, but that's a much smaller room (13 by 10, or so, I believe), and then I have to cut smaller floor pieces to fill in the gaps near the walls (such as the one in the lower left). I should be able to knock out most, if not all, of this in the next week -- assuming all goes OK.

So, enjoy the sneak preview of the family room...once we get it all settled, I'll take another pic...there are a few other cool things we have up our so-called sleeves. :)

Friday, January 29, 2010

Hit the deck...well, it's concrete, so be careful...

As promised, here's what up with the basement floor...

So, we have your standard concrete slab floor. The nice thing is, it's pretty even. It's mostly level, not perfect, but there are no major mounds or valleys that would cause a problem with laying laminate.

To update, I did not want tile flooring. It was going to be expensive to cover the entire floor in the family room regardless of what we went with, and tile just was OUT of the question. Too much work, too much money and too cold a result.

So I wanted laminate wood-pattern flooring. But I was worried about water seeping under the floor and ruining it from underneath. So I decided to go with a product many of you might know about: Platon. It's used on foundation walls, but is also recommended as a waterproof underlayment for floors. It creates an air pocket between the floor and the concrete, which also helps insulate the floor somewhat too. I wanted this in case the drain (now UNDER the floor) backed up again. My thought being, if it backs up a little bit (like last time...it wasn't much and it was clean rainwater from the pit in the backyard), it will spread out underneath the floor, eventually drain back out and eventually dry (the floor "breathes" around the edges beneath the baseboards). Mold should not grow because there is no "food" underneath, and the Platon is sealed together. Yes, if the drain backed up really badly, the water would eventually overwhelm the space under the floor and overflow into the walls and onto the floor, but if that happens, I figure I've got a lot of other issues to worry about...by then the whole basement will be done for anyway.

On top of the Platon, according to manufacturer's instructions, goes the pad and the laminate right on top of that. Right now, I have to do half the basement at a time (because we have furniture already), so I have the Platon laid and sealed on the largest part of the basement, and the padding spread across about half of that area. Tomorrow I expect I'll start laying the laminate. I'm excited, as I just bought a table saw for the project -- so I'll get to open that and "play" and also get this project even closer to done. My goal is to get the floor down before the Super Bowl...it's going to be tight, but I think if I can knock out a major portion of it tomorrow, I'll be OK. The remainder of it is a much smaller section, and even better, is mostly a straight square (whereas this part of the room has a few jogs in the wall that I'll have to cut around).

Pictures when I'm finished...no fair peeking! :)

Tuesday, January 26, 2010

Is it 2010 yet...


house decor 2009
Originally uploaded by southsideandy
Here's what the bungalow looked like all decked out this year. We actually expanded our decorations to the lawn and the yew bushes, special thanks to our getting our pre-lit tree 75% off the previous Dec. 26 at Target. So we had extra lights, which we then traded in at Home Depot for LEDs (during their trade-in coupon deal prior to Christmas).

Now, I'm obviously way behind, so here goes nothing ...

2009 is in the rear-view mirror, and we're none the worse for it here at Building a Better Bungalow. Sure, there are folks out there who fared far, far worse than we did -- hell, we both kept our jobs, even though I took a tremendous pay cut and tremendous staff cuts all around me. Basically, the old adage: more work, less pay.

That led to far less time to work on the house, as did A.J.'s rapid growing up. We are preparing for birthday No. 2 -- suffice to say, the attention and love we've given him along with everyone else around him has paid off. He can recognize every single capital letter of the alphabet, can now mostly count to 12 (though he doesn't know what "counting" is...) and can "sing" a couple songs, such as a few lines from "Frosty the Snowman" and most of "Baa, Baa Black Sheep." He's a great communicator for his age...of course, with all this attention being given him, he's only now finally learning how to even consider playing or "reading" a book by himself. Either way, I love him, of course. But he has obviously taken up tons of my time (and that's a good thing, of course).

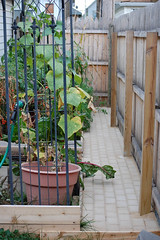
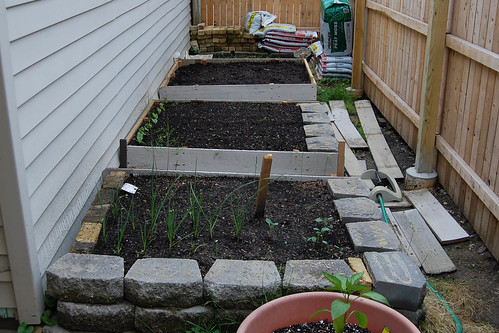
Since my last post in September, I'm not sure what I can say has gone on around here. We've fixed some things, decorated the house big-time for Christmas (as you can see). But really, there wasn't much "bungalow-related" action around here for a while. My garden indeed was a hit. I actually was able to harvest some broccoli ON THANKSGIVING and cook it up instantly for our families. It wasn't much, but as many of you know, there's nothing that beats fresh-picked produce.

Since December, though, things have been picking up. We got the family room to the point of being drywalled for A.J.'s party last March, but then work fell silent down there for quite a while. Well, aside from a few touchups, painting is finally DONE, finished a couple weeks ago. That allowed me to move on to more fun tasks, such as laying the floor...I've been waiting for this for a while. I'll post more on my progress and step-by-steps in a future post...

Once I get the floor in, we'll be ready for trim work and final electricals...we already have the TV, sectional and most of the furniture we need...so after that, we're done. That will be a great, great day!

We recently also bought new dining room table and chairs, mission style from Broyhill. They look much, much better than Gina's iron-and-glass set, in the sense of they fit the room and style much more. We're fighting through getting bedroom furniture -- but that too is another story for another day. Suffice to say, the Chicago Bungalow's staircase has foiled us once again.

I got a seed catalog in the mail the other day, and that got me itching to put in an order...I'm excited to get the veggies going again, building off what I learned last year. I also planted a TON of tulip bulbs in the backyard, and I'm hoping to see the fruits of that labor in the spring. Then, of course, there are plenty of flowers and perennials to deal with.

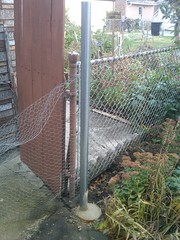
Lastly, I'm hoping against hope that the relatively dry winter we've had (relatively) continues. One of the main projects this year will (MUST) be to basically blow up the backyard and "start over" -- ripping down the hot tub and "carport" over it, and filling in the areas adjacent to the alley to prevent flooding of the yard backing up into the house. I cannot and will not jeopardize the work and money we've put into the basement because the city thought the alley should sit 8 inches above our yard decades ago. Too much at stake.

So, anyway, I leave you with that, for now...as things move along well into 2010, I wish you well and look forward to actually having projects, photos and stories to talk about again -- thanks for sticking with me! :)